Developer Guide
This is the Developer Guide for Jarvis, a desktop app for CS1101S Teaching Assistants (Avengers) that helps them keep track of their grading duties and consultations. It is optimized for use via a Command Line Interface (CLI) while still having the benefits of a Graphical User Interface (GUI).
Table of Contents
- Introduction
- Setting up, getting started
- Design
- Implementation
- Documentation, logging, testing, configuration, dev-ops
- Appendix: Requirements
- Appendix: Instructions for manual testing
- Appendix: Effort
1. Introduction
1.1 Purpose
The purpose of this document is to cover the multi-level design architecture of Jarvis, so that the intended audience of this document can understand the relationship between components that make up Jarvis.
1.2 Audience
This developer guide is for anyone who wants to understand the internal software architecture of Jarvis. The following groups of people are the intended audience:
- Jarvis developers: anyone who wish to upgrade Jarvis to support more functions.
- CS1101S Avengers: tutors of CS1101S who wants to improve their efficiency and productivity.
1.3 Jarvis Overview
Jarvis is a desktop app for CS1101S Teaching Assistants (Avengers), optimized for use via a Command Line Interface (CLI) while still having the benefits of a Graphical User Interface (GUI). Jarvis in general helps to organise and simplify CS1101S tutors’ administrative tasks.
2. Setting up, getting started
Refer to the guide Setting up and getting started.
3. Design
3.1 Architecture

The Architecture Diagram given above explains the high-level design of Jarvis. Given below is a quick overview of each component.
.puml files used to create diagrams in this document can be found in the diagrams folder. Refer to the PlantUML Tutorial at se-edu/guides to learn how to create and edit diagrams.
Main has two classes called Main and MainApp. It is responsible for,
- At app launch: Initializes the components in the correct sequence, and connects them up with each other.
- At shut down: Shuts down the components and invokes cleanup methods where necessary.
Commons represents a collection of classes used by multiple other components.
The rest of Jarvis consists of five components.
-
UI: The UI of the app. -
Logic: The command executor. -
Model: Holds the data of the app in memory. -
Storage: Reads data from, and writes data to, the hard disk. -
Scraper: Scrapes https://sourceacademy.nus.edu.sg for course-info.
Each of the five components,
- defines its API in an
interfacewith the same name as the Component. - exposes its functionality using a concrete
{Component Name}Managerclass (which implements the corresponding APIinterfacementioned in the previous point.
For example, the Logic component (see the class diagram given below) defines its API in the Logic.java interface and exposes its functionality using the LogicManager.java class which implements the Logic interface.

How the architecture components interact with each other
The Sequence Diagram below shows how the components interact with each other for the scenario where the user issues
the command delete -c 1.

The sections below give more details of each component.
3.2 UI component

API :
Ui.java
The UI consists of a MainWindow that is made up of parts e.g.CommandBox, ResultDisplay, XYZListPanel,
StatusBarFooter etc. All these including the MainWindow, inherit from the abstract UiPart class.
XYZListPanel refers to the various types of {Feature Type}ListPanel
objects. These are namely StudentListPanel, MissionListPanel, QuestListPanel, ConsultationListPanel, MasteryCheckListPanel and TaskListPanel.
The UI component uses JavaFx UI framework. The layout of these UI parts are defined in matching .fxml files that are in the src/main/resources/view folder. For example, the layout of the MainWindow is specified in MainWindow.fxml
The UI component,
- Executes user commands using the
Logiccomponent. - Listens for changes to
Modeldata so that the UI can be updated with the modified data.
3.3 Logic component

API :
Logic.java
-
Logicuses theAddressBookParserclass to parse the user command. - This results in a
Commandobject which is executed by theLogicManager. - The command execution can affect the
Model(e.g. adding aStudent). - The result of the command execution is encapsulated as a
CommandResultobject which is passed back to theUi. - In addition, the
CommandResultobject can also instruct theUito perform certain actions, such as displaying help to the user.
Given below is the Sequence Diagram for interactions within the Logic component for the execute("delete -c 1") API call.
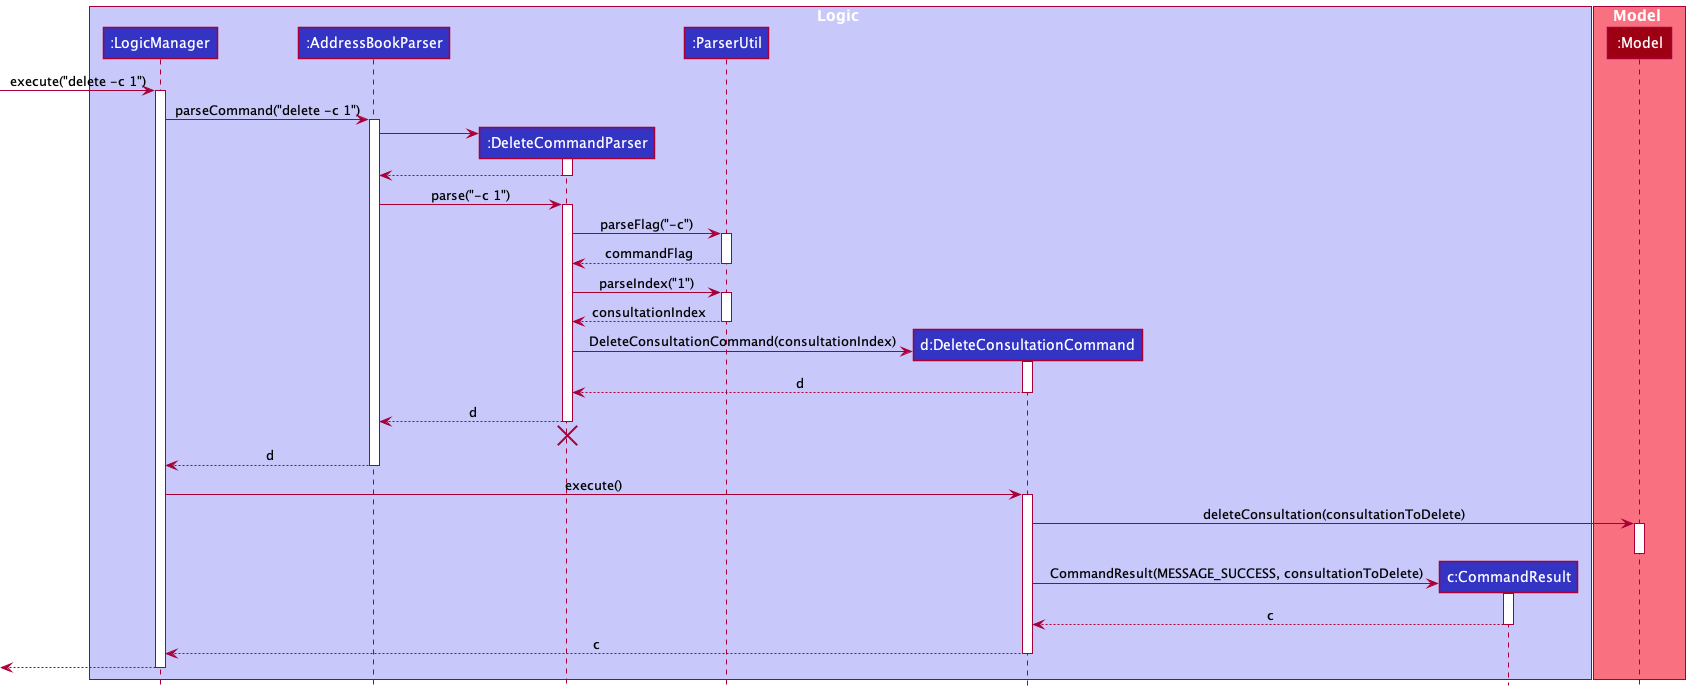
DeleteCommandParser should end at the destroy marker (X) but due to a limitation of PlantUML, the lifeline reaches the end of diagram.
3.4 Model component

API : Model.java
The Model,
- stores a
UserPrefobject that represents the user’s preferences. - stores a
UserLoginobject that represents the user’s Source Academy login details. - stores the DATA_CLASS -
Mission,Quest,Task,MasterCheck,Consultation- in the addressbook. - exposes unmodifiable
ObservableList<DATA_CLASS>for each DATA_CLASS that can be ‘observed’ e.g. the UI can be bound to this list so that the UI automatically updates when the data in the list change. - does not depend on any of the other three components.
3.5 Storage component

API : Storage.java
The Storage component,
- can save
UserPrefobjects in json format and read it back. - can save
UserLoginobjects in json format and read it back. - can save the jarvis data in json format and read it back.
3.6 Scraper component
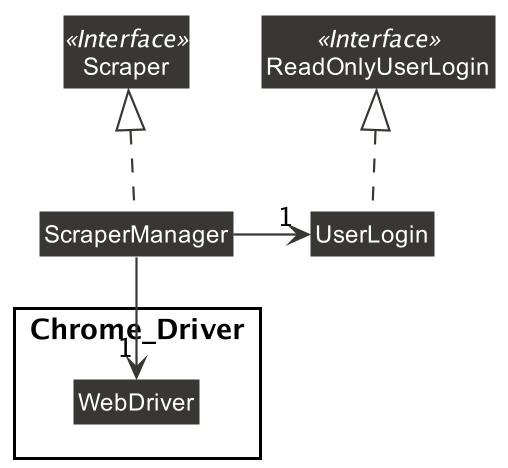
API : Scraper.java
The Scraper component,
- reads user login information from the
UserLoginobject passed to it. - uses the Chrome_Driver package to scrape Source Academy for course-info such as
Missions,Quests,Studentnames. - can save the scraped information to
Model.
3.7 Common classes
Classes used by multiple components are in the seedu.jarvis.commons package.
4. Implementation
This section describes some noteworthy details on how certain key features have been implemented.
4.1 Login
In this section, we will introduce how the login process works. We will do so through showing the expected path-execution
and interaction of objects between the ScraperManager and Chrome Driver.
4.1.1 What is the login process
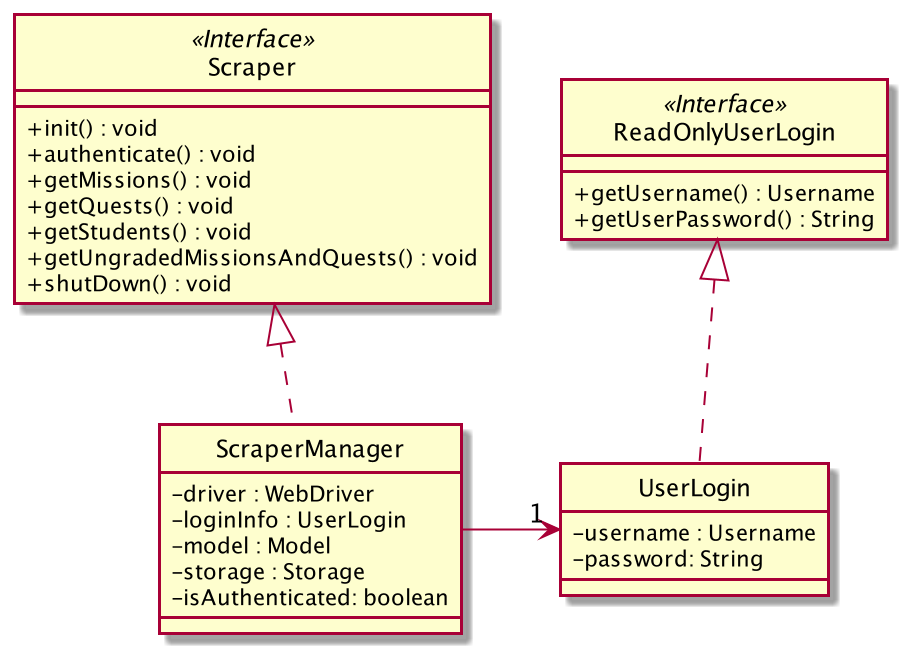
Login is a series of method calls that any new user who uses Jarvis has to go through. It is carried out by ScraperManager and involves fetching information from Source Academy (SA) through the use of a headless browser, Chrome_Driver.
4.1.2 Structure of login process
The following diagram shows the class relationship between the ScraperManager and other related classes. This will help you understand the login process.
4.1.3 Path Diagram of login process
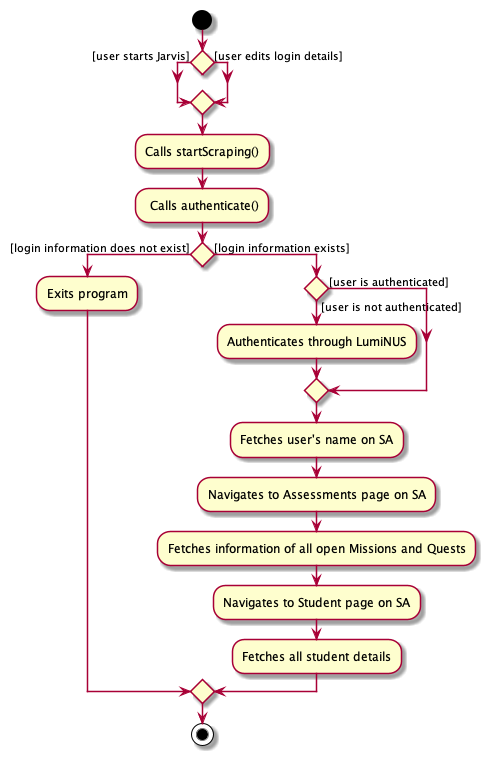
The following diagram shows the path execution from the user’s perspective when he or she logs in into Jarvis. The login process is kickstarted whenever Jarvis is launched or the login details are edited.
4.1.4 Sequence Diagram of login process
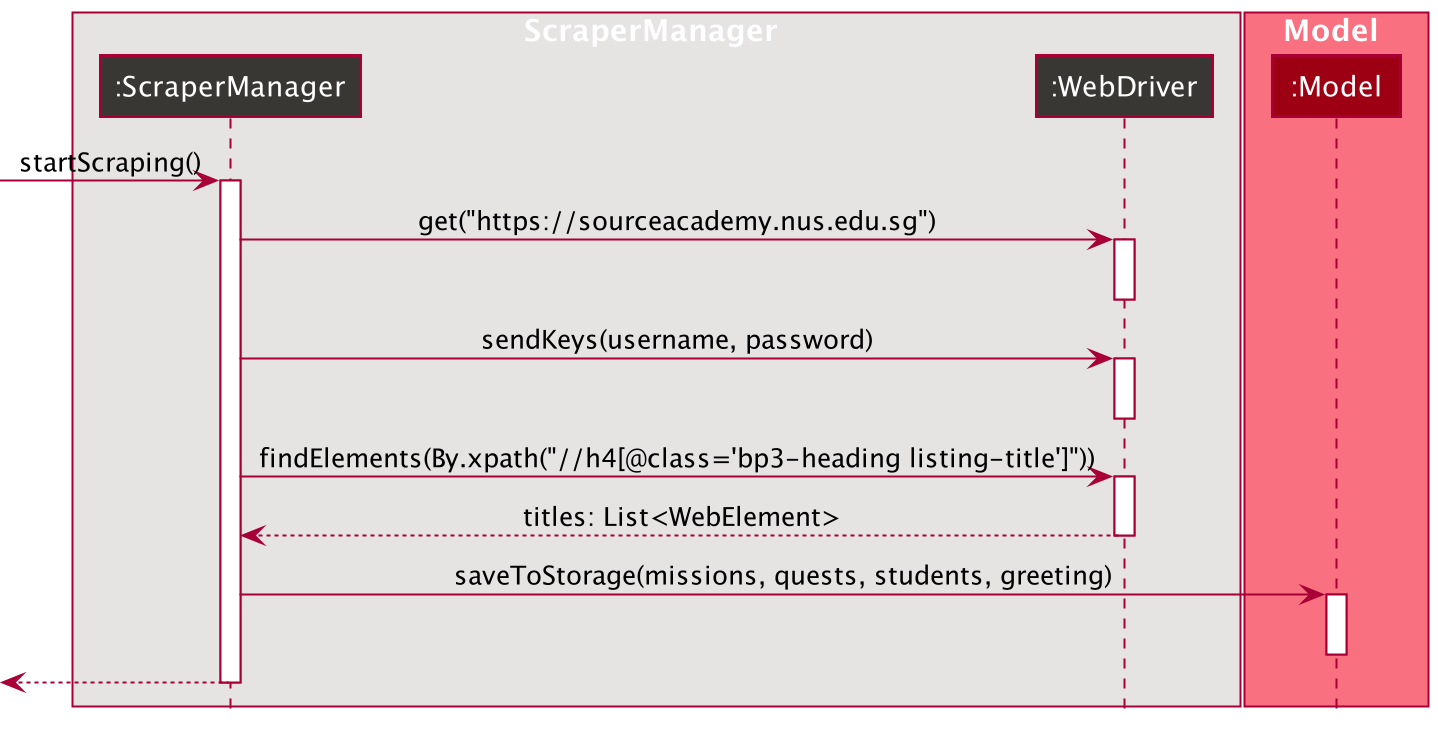
- The descriptor within the
XPath.by(...)is the HTML descriptor for the HTML element that corresponds to each individual assessment title on Source Academy. - The
Chrome Driver, which is of typeWebDriver, will look for all HTML elements on Source Academy that matches the HTML descriptor we passed in. -
WebDriverwill return aList<WebElement>, with each element in the list corresponding to a single CS1101S mission, in the case of scraping for missions. This list could be of size 0 if there are no active missions that day. - The scraping of quests and students work similarly to this as well.
- The greeting in the diagram refers to the name of the CS1101S Avenger which will also be fetched and displayed in Jarvis upon login.
-
startScraping()runs on a background thread, separate from the main thread. This ensures that the time-consuming task of fetching missions, quests and students do not delay the updating of the GUI. - In the event the login details are incorrect, Jarvis will resolve the problem by starting up with saved data (if it exists) or mock data (if it does not exist).
4.2 View Command
In this section, we will introduce the View Command. It will show the structure of the ViewCommand class and the ViewCommandParser
class, as well as the path diagram and sequence diagram of the ViewMissionDeadlineCommand to capture the interactions between
the ViewMissionDeadlineCommand and other object classes.
4.2.1 What is ViewCommand
ViewCommand is an abstract class encapsulating the different view commands for the following: Student,
Mission, Quest, Consultation, Mastery Check and Task.
4.2.2 Structure of ViewCommand
The following diagram shows the overview of the ViewCommand Class Diagram:
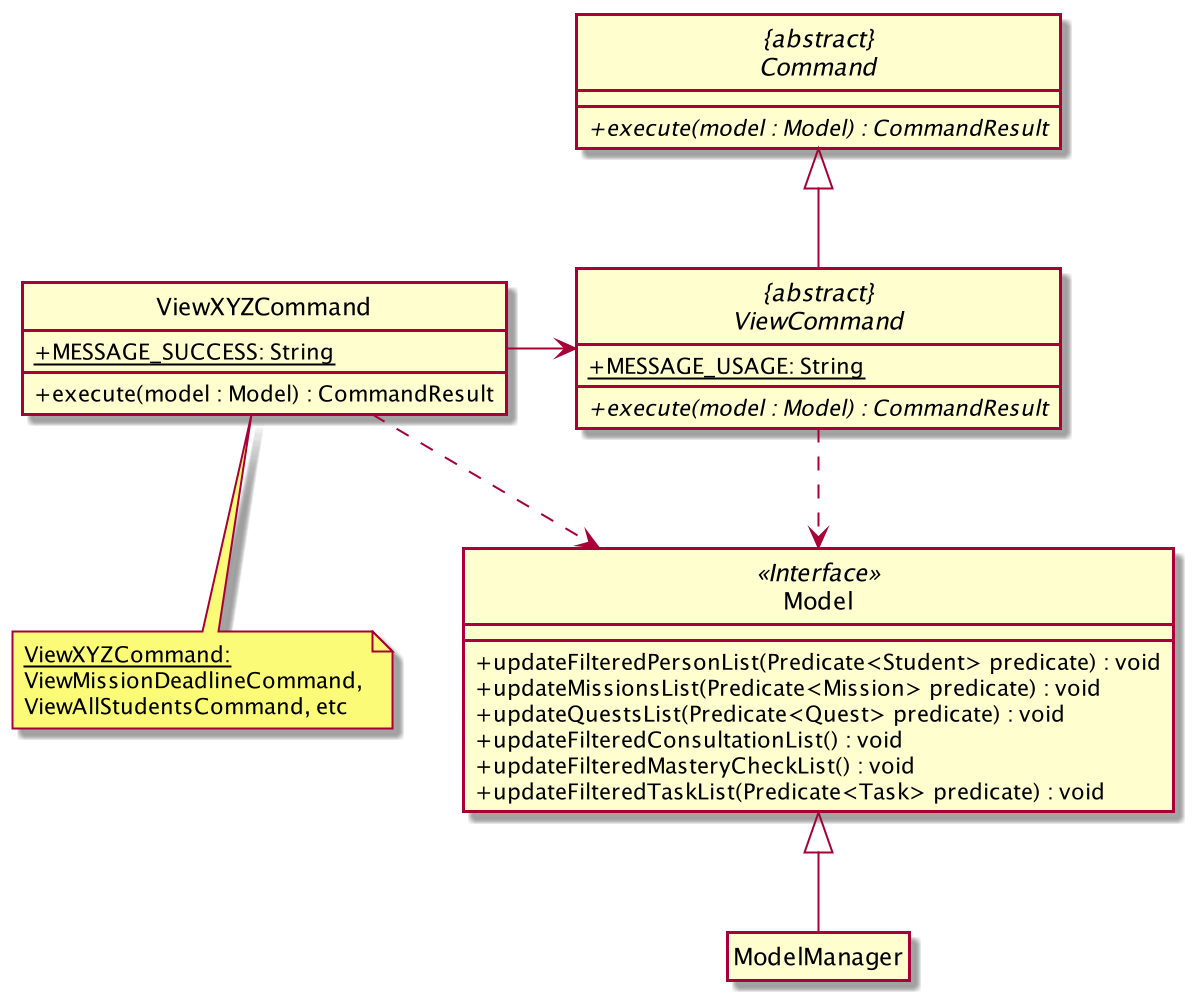
The abstract class ViewCommand extends from the abstract class Command. In the ViewCommand class, the abstract
method execute takes in a Model object. As such, all view commands that extend from the ViewCommand class will implement
the execute method. Thus, all view command classes have a dependency on Model.
In the ViewCommand class, there is a static message MESSAGE_USAGE for when the user does not include a second argument since
view has to take in at least one argument. The message will guide the user on what parameters the ViewCommand can take in.
In all the view commands that extend from ViewCommand, there is a static message MESSAGE_SUCCESS for when the command
has executed successfully. The message will be shown to the user to indicate success.
4.2.3 Structure of ViewCommandParser
The following diagram shows the overview of the ViewCommandParser Class Diagram:
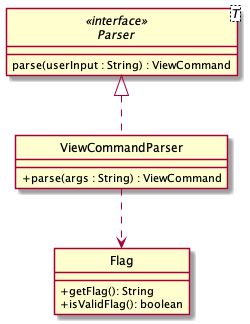
In the ViewCommandParser class, under the parse() method, we reference the Flag class which is a class that encapsulates
the different flags that ViewCommand can parse. We use the Flag class to check for whether an input is valid and go on to parse
the flag and return the correct ViewCommand object.
4.2.4 Path Diagram of ViewMissionDeadlineCommand
As there are many ViewCommand subclasses such as ViewAllStudentsCommand and ViewConsultationsCommand,
we will only bring in one of them. In this and the following section, we will be using the ViewMissionDeadlineCommand
as an example for the ViewCommand path diagram and sequence diagram.
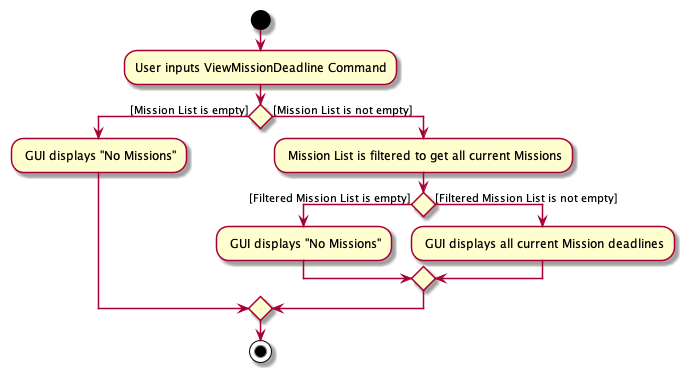
The diagram below demonstrates the expected path execution of ViewMissionDeadlineCommand.
The other ViewCommand subclasses will execute similarly.
4.2.5 Sequence Diagram of ViewMissionDeadlineCommand
The sequence diagram for the ViewMissionDeadlineCommand is shown below:
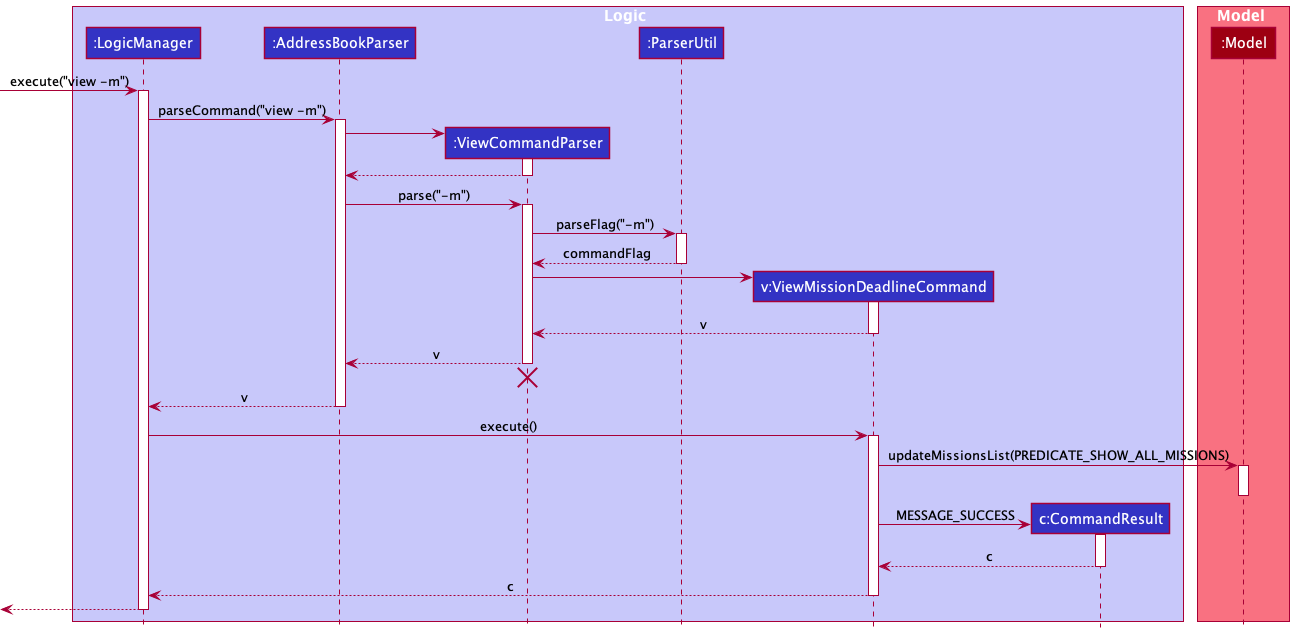
The LogicManager will call the parseCommand method of AddressBookParser, which then passes the second argument to the ViewCommandParser object.
The ViewCommandParser, after parsing the necessary arguments through static methods of the ParserUtil class, will return a ViewMissionDeadlineCommand object.
This object will then be returned to the LogicManager. Next, the LogicManager will call the execute(model) method using the
ViewMissionDeadlineCommand object. In this method, it will use the Model object to call the method updateMissionList(), with parameter PREDICATE_SHOW_ALL_MISSIONS which will show all the missions. When completed, the execute(model) will return a
CommandResult object with the success message to the LogicManager, indicating that the command execution is a success.
The other ViewCommand subclasses work similarly to this as well.
4.3 Add Command
In this section, we will introduce the Add Command. It will show the structure of the AddCommand class and the AddCommandParser
class, as well as the path diagram and sequence diagram of the AddTaskCommand to capture the interactions between
the AddTaskCommand and other object classes.
AddCommand overall structure is similar to that of the ViewCommand above.
4.3.1 What is AddCommand
AddCommand is an abstract class encapsulating the different add commands for the following: Consultation,
Mastery Check and Task.
4.3.2 Structure of AddCommand
The following diagram shows the overview of the AddComand Class Diagram:
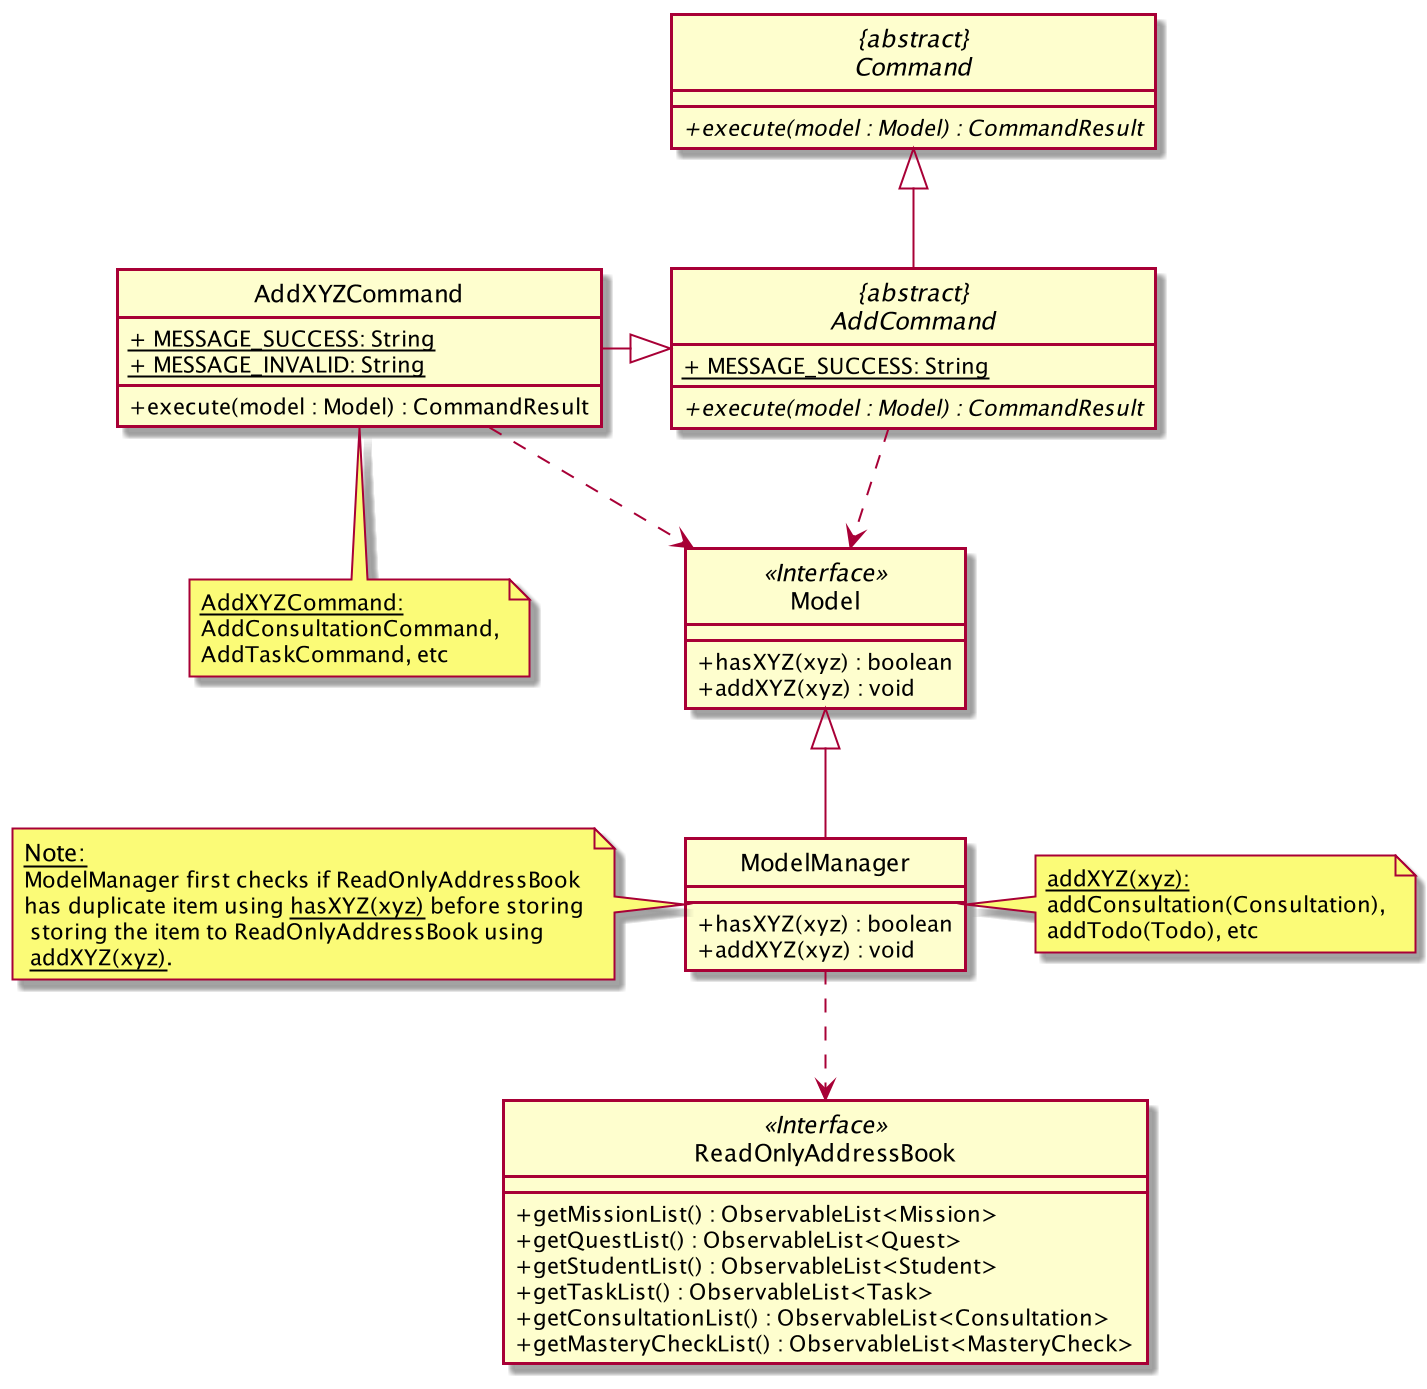
-
Upon parsing user input to the correct
AddCommand(ie.AddXYZCommand) which is done by theAddCommandParser, the correctModelobject (eg.Student,Task) will be added to the corresponding list inModelclass. -
Then, updated lists of data will be observed by the
AddressBook, and displayed on the GUI.
The abstract class AddCommand extends from the abstract class Command. In the AddCommand class, the abstract
method execute takes in a Model object. As such, all add commands that extend from the AddCommand class will implement
the execute method. Thus, all add command classes have a dependency on Model.
In the AddCommand class, there is a static message MESSAGE_USAGE for when user does not include a second argument since
add has to take in at least one argument. The message will guide the user on what parameters the AddCommand can take in.
In all the add commands that extend from AddCommand, while there is a static message MESSAGE_SUCCESS for when the
command has executed successfully, there is also a static message MESSAGE_INVALID that comes in different variants for
when the command has not executed successfully due to an expected error from the user.
4.3.3 Structure of AddXYZCommand
The following diagram shows the overview of AddCommand detailed Class Diagram which has a similar structure as other Commands:
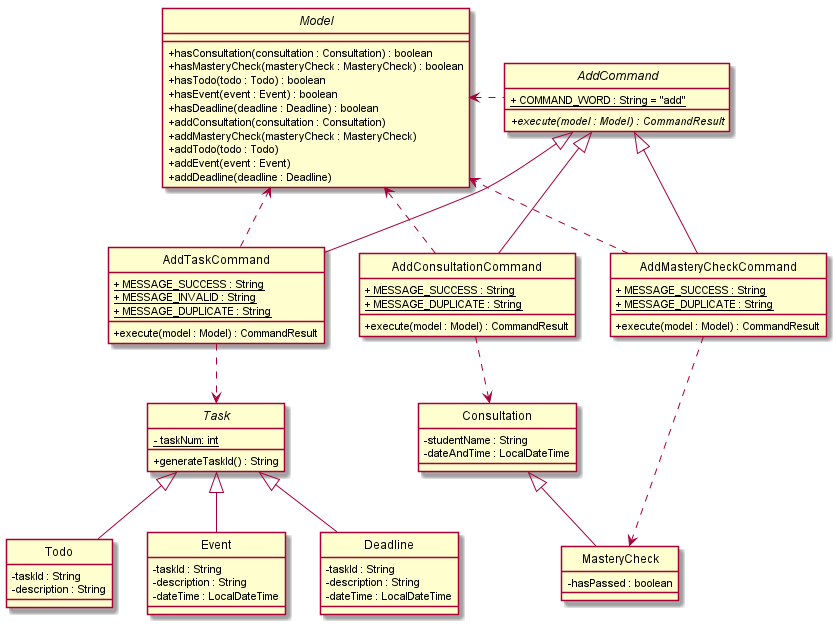
- The class
AddCommandcontains 3 subclasses:AddTaskCommand,AddConsultationCommandandAddMasteryCheckCommand. - These
AddCommandsubclasses interacts withModeland the related class models eachAddCommandis supposed to execute with. - Upon successful
AddCommand, these subclasses communicates withModelto addTask,ConsultationandMasteryCheckintoModel.
4.3.4 Structure of AddCommandParser
The following diagram shows the overview of the AddCommandParser Class Diagram:
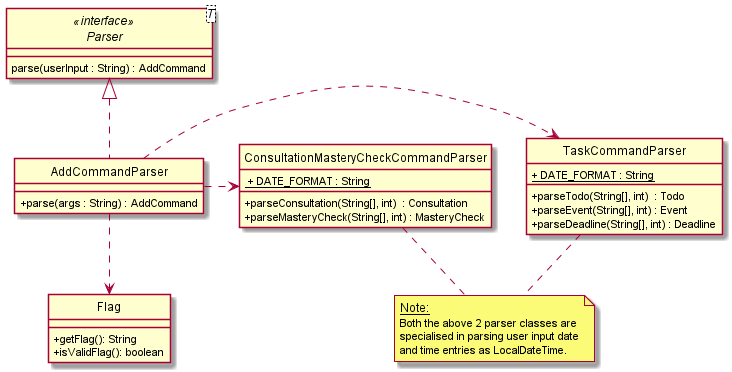
In the AddCommandParser class, under the parse() method, we reference the Flag class which is a class that encapsulates
the different flags that AddCommand can parse. We use the Flag class to check for whether an input is valid and go on to parse
the flag and return the correct AddCommand object.
Due to Java LocalDateTime class used for our Consultation, MasteryCheck, Event and Deadline objects, ConsultationMasteryCheckCommandParser
and TaskCommandParser are employed to parse the objects added.
4.3.5 Path Diagram of AddTaskCommand
As there are many AddCommand subclasses such as AddTaskCommand and AddConsultationCommand,
we will only bring in one of them. In this and the following section, we will be using the AddTaskCommand
as an example for the AddCommand path diagram and sequence diagram.
The diagram below demonstrates the expected path execution of AddTaskCommand.
The other AddCommand subclasses will execute similarly.
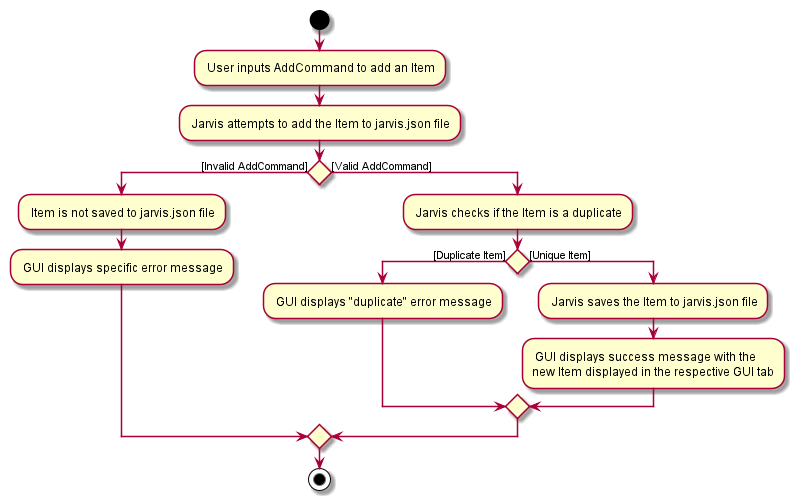
Task types, namely, Todo, Event and Deadline.
4.3.6 Sequence Diagram of AddTaskCommand
The sequence diagram for the AddTaskCommand adding an Event is shown below:
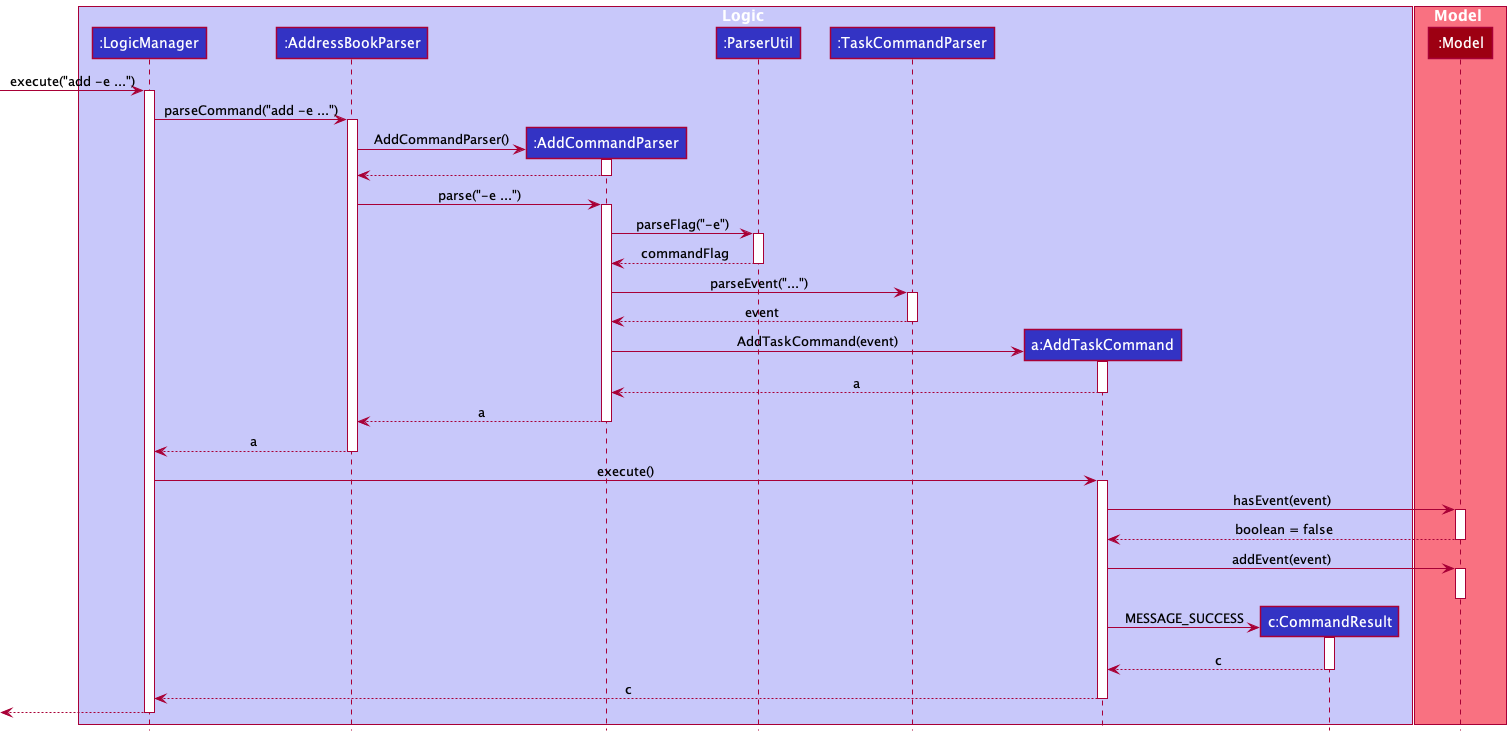
The LogicManager will call the parseCommand method of AddressBookParser, which then passes the second argument to the newly created AddCommandParser object.
The AddCommandParser will then call the specific parse method, in this case, parseEvent method of TaskCommandParser. TaskCommandParser returns an Event object
created to AddCommandParser so that it can return a new AddTaskCommand created with the Event object.
This object will then be returned to the LogicManager. Next, the LogicManager will call the execute(model) method using the
AddTaskCommand object. In this method, it will use the Model object to call the method hasEvent(), which checks if there is a duplicated Event in the Model.
Once successful, the execute(model) will return a CommandResult object with the success message to the LogicManager, indicating that the command execution is a success.
The other AddCommand subclasses work similarly to this as well.
4.4 Delete Command
In this section, we will introduce the Delete Command. It will show the structure of the DeleteCommand class and the DeleteCommandParser
class, as well as the path diagram and sequence diagram of the DeleteConsultationCommand to capture the interactions between
the DeleteConsultationCommand and other object classes.
4.4.1 What is DeleteCommand
DeleteCommand is an abstract class encapsulating the different delete commands for Consultations,
Mastery Checks, and Tasks.
4.4.2 Structure of DeleteCommand
The following diagram shows the overview of the DeleteCommand Class Diagram:
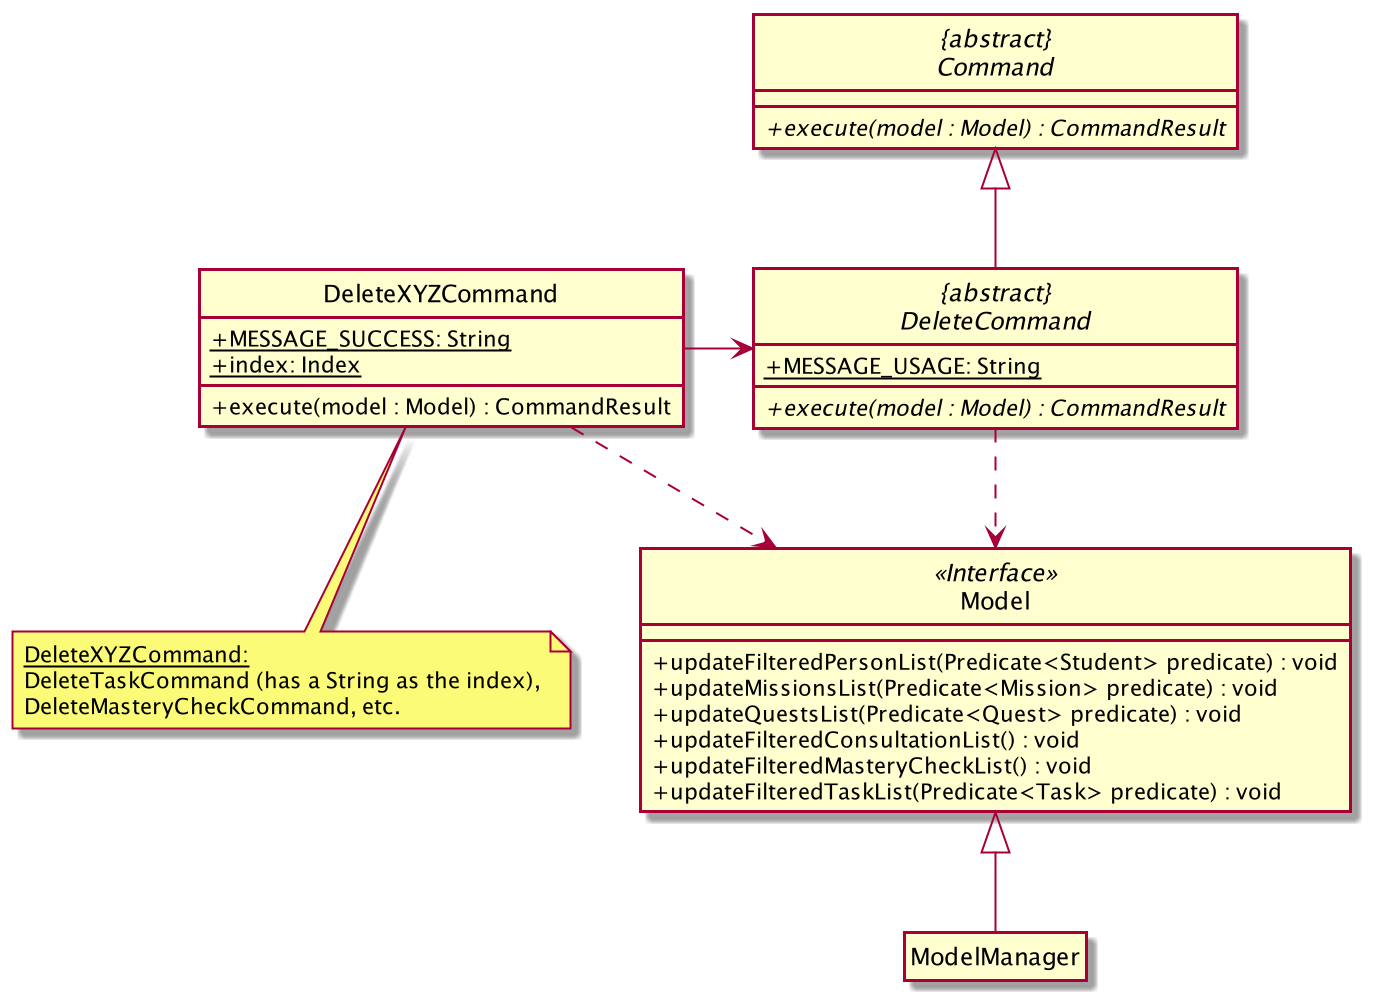
The abstract class DeleteCommand extends from the abstract class Command. In the DeleteCommand class, the abstract
method execute takes in a Model object. As such, all delete commands that extend from the DeleteCommand class will implement
the execute method. Thus, all delete command classes have a dependency on Model.
In the DeleteCommand class, there is a static message MESSAGE_USAGE for when user does not include a second argument since
delete has to take in at least one argument. The message will guide the user on what parameters the DeleteCommand can take in.
In all the delete commands that extend from DeleteCommand, there is a static message MESSAGE_SUCCESS for when the command
has executed successfully. The message will be shown to the user to indicate success.
4.4.3 Structure of DeleteCommandParser
The following diagram shows the overview of the DeleteCommandParser Class Diagram:
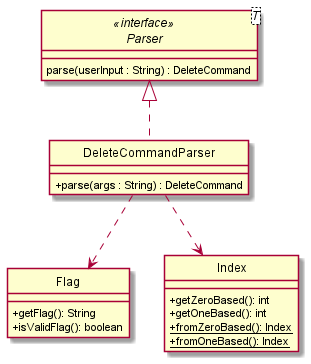
In the DeleteCommandParser class, under the parse() method, we reference the Flag class which is a class that encapsulates
the different flags that DeleteCommand can parse. We use the Flag class to check for whether an input is valid and go on to parse
the flag and return the correct DeleteCommand object.
Additionally, under the same method, we reference the Index class which encapsulates
the numerical indexes that DeleteCommand can parse. We use the Index class to check for whether the input is a non-zero unsigned integer
and go on to parse the index and provide the parameter necessary to instantiate the aforementioned DeleteCommand object.
The Index only applies for DeleteConsultationCommand and DeleteMasteryCheckCommand as DeleteTaskCommand utilizes a String to store identifiers instead;
however, they are similar in how they operate and interact with the rest of the system.
4.4.4 Path Diagram of DeleteConsultationCommand
As there are many DeleteCommand subclasses such as DeleteMasteryCheckCommand and DeleteTaskCommand,
we will only bring in one of them. In this and the following section, we will be using the DeleteConsultationCommand
as an example for the DeleteCommand path diagram and sequence diagram.
The diagram below demonstrates the expected path execution of DeleteConsultationCommand.
The other DeleteCommand subclasses will execute similarly.
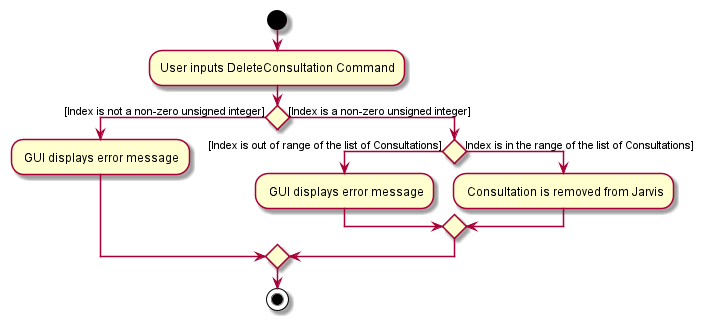
4.4.5 Sequence Diagram of DeleteConsultationCommand
The sequence diagram for the DeleteConsultationCommand is shown below:

The LogicManager will call the parseCommand method of AddressBookParser, which then passes the arguments to the DeleteCommandParser object.
The DeleteCommandParser, after parsing the necessary arguments through static methods of the ParserUtil class, will return a DeleteConsultationCommand object.
This object will then be returned to the LogicManager. Next, the LogicManager will call the execute(model) method using the DeleteConsultationCommand object.
In this method, it will use the Model object to call the method deleteConsultation() with parameter consultationToDelete which will delete the specified
Consultation from the list of Consultations stored in Jarvis. When completed, the execute(model) will return a CommandResult object with the success message
to the LogicManager, indicating that the command execution is a success.
The other DeleteCommand subclasses work similarly to this as well.
4.5 Edit Command
In this section, we will introduce the Edit Command. It will show the structure of the EditCommand class as well as the path diagram and sequence diagram of the
EditLoginCommand to capture the interactions between the EditLoginCommand and other object classes.
4.5.1 What is EditCommand
The EditCommand is an abstract class encapsulating the different implementations to edit Student, UserLogin and MasteryCheck.
4.5.2 Structure of EditCommand
The following diagram shows the overview of the EditCommand Class Diagram:
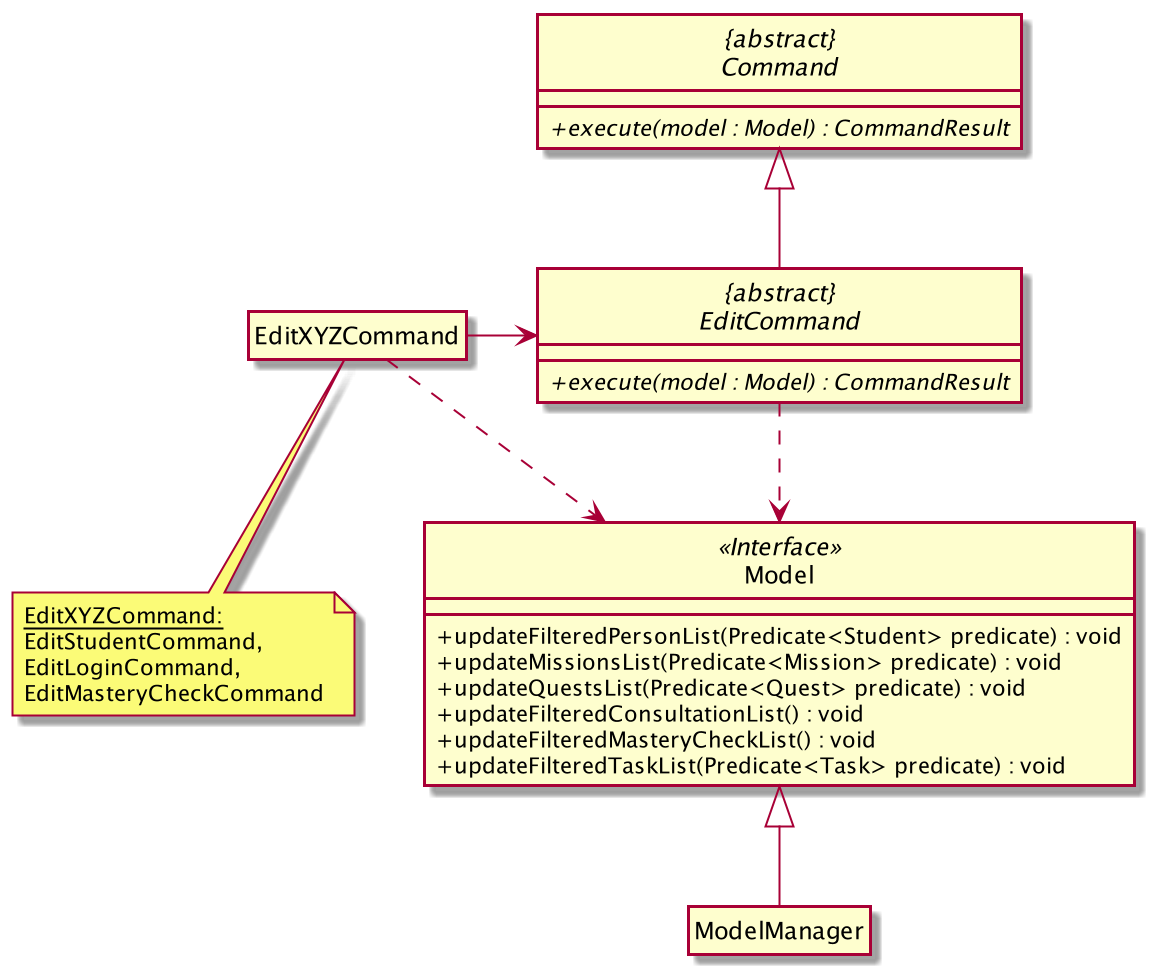
- Upon parsing user input to the correct
EditCommand(ie.EditXYZCommand) which is done by theEditCommandParser, the correctModelobject (eg.Student,UserLogin) will be added to the corresponding list inModelclass. - Then, updated lists of data will be written to the
AddressBook, and displayed on the GUI.
4.5.3 Path Diagram of EditLoginCommand
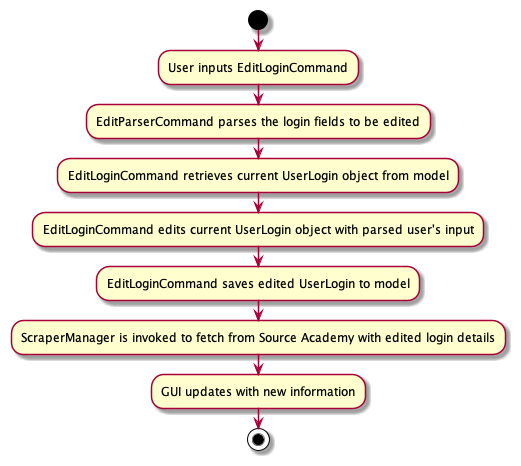
There are 3 EditCommand subclasses - EditStudentCommand, EditLoginCommand and EditMasteryCheckCommand.
We will only use the EditLoginCommand as an example for the EditCommand path diagram and sequence diagram.
The diagram below demonstrates the expected path execution of EditLoginCommand.
The other EditCommand subclasses will execute similarly, less the calls to ScraperManager to re-scrape Source Academy.
4.5.4 Sequence Diagram of EditLoginCommand
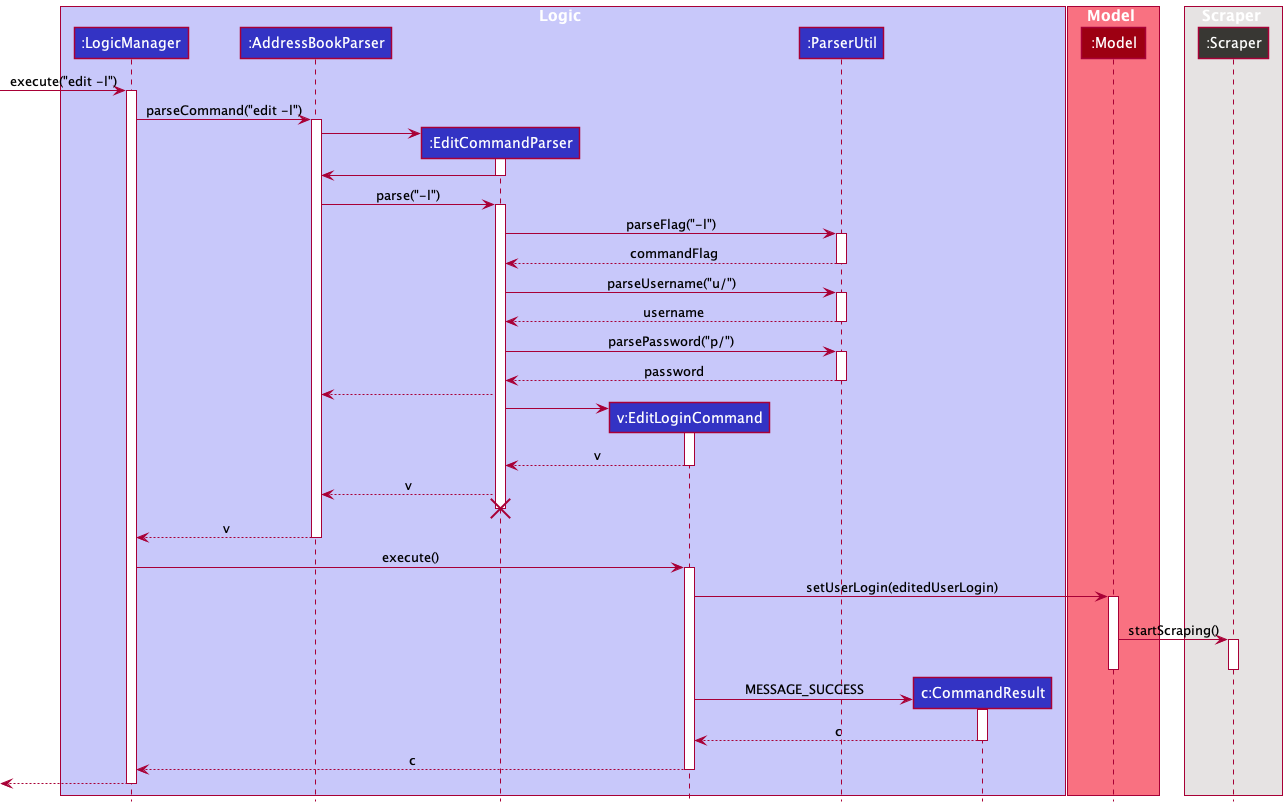
The sequence of method calls are highly similar to that for the EditLoginCommand above. What is of note is the additional call to Scraper.
This is executed to allow Jarvis to refresh the GUI with updated information relevant to the new user that has logged in.
4.6 Automatic Tab Switching
In this section we will explain how the Automatic Tab Switching Feature feature works. We will do so by going
through a sequence diagram.
4.6.1 What is Automatic Tab Switching
Automatic Tab Switching is a feature where the displayed tab automatically changes to the relevant tab: Student,
Missions, Quests, Consultations, Mastery Checks and Tasks for the user’s input command.
4.6.2 Sequence Diagram of the Automatic Tab Switching process
The following is a sequence diagram explaining the interaction between MainWindow, LogicManager and
CommandResult after the user keys in a command and presses the enter key in the Graphical User Interface.
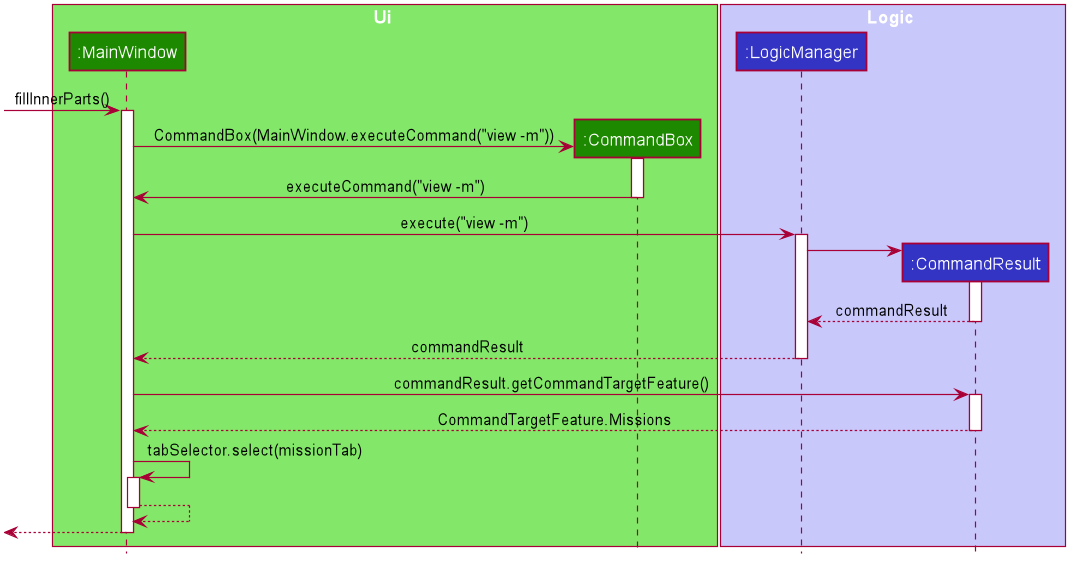
On start up of the GUI the fillInnerParts method of MainWindow is called, creating a CommandBox object with
a method reference to MainWindow’s executeCommand method passed as parameter to the constructor.
The CommandBox object will take the command keyed into the commandBox Ui component, in this case "view -m", as parameters to
MainWindow’s executeCommand method, thereby invoking a call to the LogicManager’s execute method. LogicManager creates a CommandResult object and returns it to MainWindow.
MainWindow class calls the CommandResult object’s getCommandTargetFeature method, which then returns a
CommandTargetFeature, Enum
corresponding to the feature that the user input command relates to. Based on that Enum, MainWindow then selects the
corresponding tab using its local variable tabSelector. In this case Missions was returned and hence the
missionTab was selected.
As such, the corresponding tab is selected after a user command is inputted.
This feature works the same way for
viewing Students, Quests, Consultations, MasteryChecks and Tasks. In each case, the
corresponding CommandTargetFeature Enum is returned resulting in the corresponding tab selection.
4.7 Summary Feature
In this section we will explain how the Summary Feature is implemented by going through a sequence diagram.
4.7.1 What is the Summary Feature
Summary Feature refers to the summary string at the top right-hand corner of the Jarvis Graphical User Interface. It
summarises the ungraded Missions and Quests, upcoming Consultations and MasteryChecks as well as outstanding Tasks.
It is always updated at any point in time of using Jarvis.
4.7.2 Sequence Diagram of Summary Feature
In order for the Summary string to be updated upon starting up the Jarvis Graphical User Interface and in sync with the
changes in data after each command, Jarvis calls the ModelManager’s updateAllSummaryDetails method
upon start up and after each command is executed. The following is a sequence diagram when a user command is
entered.
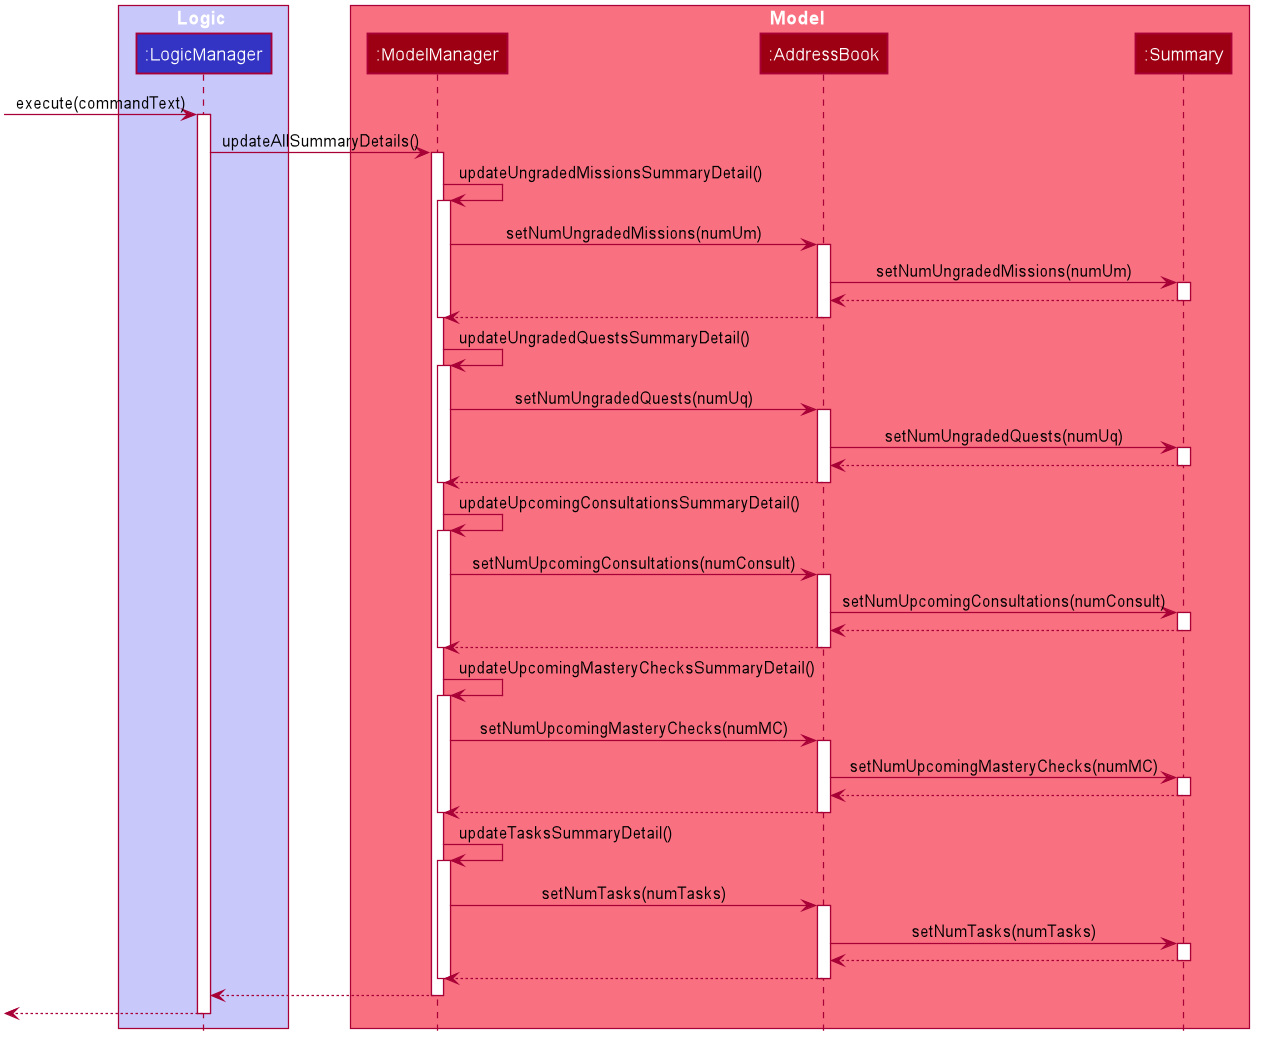
Upon keying in the user command, LogicManager’s execute method is called. This leads to the calling of
ModelManager’s updateAllSummaryDetails method, which thereby leads to a series of function calls to
ModelManager’s own methods updateUngradedMissionsSummaryDetail, updateUngradedQuestsSummaryDetail and so
fourth.
Each of the methods obtains the
length of the corresponding FilteredList to find the exact value of the summary detail such as “number of ungraded
missions”. The value is then set by calling the corresponding AddressBook setter methods, which then leads to the
corresponding call of the Summary object’s setter method call.
The always updated Summary string is obtained through the LogicManager and displayed as a Label in the Graphical
User Interface.
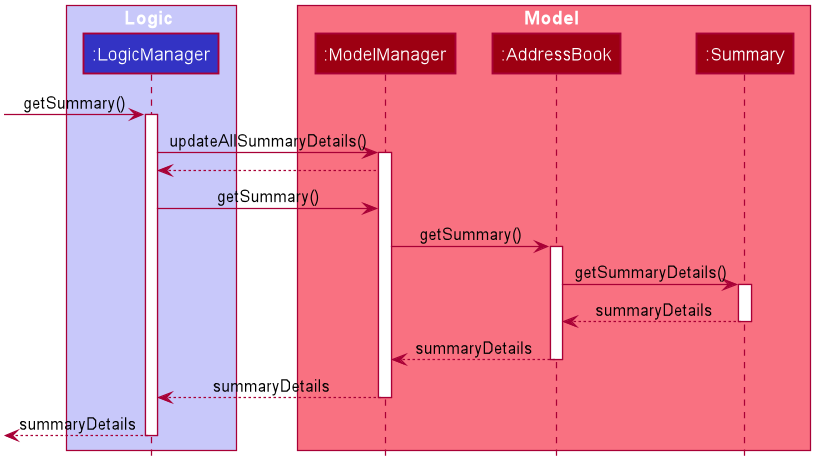
A LogicManager’s getSummary method call will lead to a sequence of method calls, which results in a StringProperty of summary details being returned.
Upon start up of Jarvis’ Graphical User Interface, the first step of calling LogicManager’s execute method is
skipped, going straight to calling the updateUngradedMissionsSummaryDetail method of ModelManager to do the
similar syncing of summary details.
5. Documentation, logging, testing, configuration, dev-ops
6. Appendix: Requirements
6.1 Product scope
Target user profile:
- CS1101S tutor who has to keep track of student submissions and consultations
- can type fast
- prefers typing to mouse interactions
- is reasonably comfortable using CLI apps
Value proposition: the only tool to keep tutor todos and responsibilities in check
6.2 User stories
Priorities: High (must have) - * * *, Medium (nice to have) - * *, Low (unlikely to have) - *
| Priority | As a … | I want to … | So that I … |
|---|---|---|---|
* * * |
tutor | see usage instructions | can refer to instructions when I forget how to use the app. |
* * * |
tutor | edit a student | can keep the contact details of all my students updated. |
* * * |
tutor | automatically view my students | can know who to contact. |
* * * |
tutor | view deadlines of missions/quests | know when I can start marking them. |
* * * |
tutor | list all unmarked assignments | will not miss out on marking any overdue missions or quests. |
* * * |
tutor | add consultations | keep track of my consultation schedule easily. |
* * * |
tutor | list consultations | be reminded of my consultation schedule. |
* * |
tutor | list only past consultations | look through my past consultation schedule. |
* * |
tutor | list only upcoming consultations | be reminded of upcoming consultations easily. |
* * * |
tutor | delete a consultation | can reflect cancellations or rescheduling. |
* * * |
tutor | add mastery checks | keep track of my mastery check schedule easily. |
* * * |
tutor | list mastery checks | be reminded of my mastery check schedule. |
* * |
tutor | list only past mastery checks | look through my past mastery check schedule. |
* * |
tutor | list only upcoming mastery checks | be reminded of upcoming mastery checks easily. |
* * * |
tutor | delete a mastery check | can reflect cancellations or rescheduling. |
* * * |
tutor | add my own tasks | can consolidate all TA and non-TA scheduling into Jarvis. |
* * * |
tutor | list my own tasks | can have an overview of all my tasks. |
* * * |
tutor | delete tasks | can keep track of completed and incompleted tasks. |
6.3 Use cases
(For all use cases below, the System is Jarvis and the Actor is the CS1101S tutor, unless specified otherwise)
Use case: UC1 - View Consultations
MSS
- User requests to view Consultations.
-
Jarvis shows a list of all Consultations.
Use case ends.
Extensions
-
1a. The user enters an invalid command.
-
1a1. Jarvis shows an error message.
Use case ends.
-
-
1b. The list is empty.
Use case ends.
Use case: UC2 - View Mastery Checks
MSS
- User requests to view Mastery Checks.
-
Jarvis shows a list of all Mastery Checks.
Use case ends.
Extensions
-
1a. The user enters an invalid command.
-
1a1. Jarvis shows an error message.
Use case ends.
-
-
1b. The list is empty.
Use case ends.
Use case: UC3 - Delete a Consultation
MSS
- User requests to delete a Consultation with the respective index in currently displayed list.
-
Jarvis deletes the Consultation.
Use case ends.
Extensions
-
1a. The user enters an invalid command.
-
1a1. Jarvis shows an error message.
Use case ends.
-
-
1b. The given index is invalid (not a non-zero unsigned integer).
-
1b1. Jarvis shows an error message.
Use case ends.
-
-
1c. The given index is out of the range of the list.
-
1c1. Jarvis shows an error message.
Use case ends.
-
-
1d. The list is empty.
Use case ends.
Use case: UC4 - Delete a Mastery Check
MSS
- User requests to delete a Mastery Check with the respective index in currently displayed list.
-
Jarvis deletes the Mastery Check.
Use case ends.
Extensions
-
1a. The user enters an invalid command.
-
1a1. Jarvis shows an error message.
Use case ends.
-
-
1b. The given index is invalid (not a non-zero unsigned integer).
-
1b1. Jarvis shows an error message.
Use case ends.
-
-
1c. The given index is out of the range of the list.
-
1c1. Jarvis shows an error message.
Use case ends.
-
-
1d. The list is empty.
Use case ends.
Use case: UC5 - Add a Consultation
MSS
- User requests to add a Consultation.
-
Jarvis adds a Consultation for the given student name at the specified date and time.
Use case ends.
Extensions
-
1a. The user enters an invalid command.
-
1a1. Jarvis shows an error message.
Use case ends.
-
-
1b. The user enters an invalid date or time.
-
1b1. Jarvis shows an error message.
Use case ends.
-
-
1c. The user does not enter all parameters (student name or date and time).
-
1c1. Jarvis shows an error message.
Use case ends.
-
Use case: UC6 - Add a Mastery Check
MSS
- User requests to add a Mastery Check.
-
Jarvis adds a Mastery Check for the given student name at the specified date and time.
Use case ends.
Extensions
-
1a. The user enters an invalid command.
-
1a1. Jarvis shows an error message.
Use case ends.
-
-
1b. The user enters an invalid date or time.
-
1b1. Jarvis shows an error message.
Use case ends.
-
-
1c. The user does not enter all parameters (student name or date and time).
-
1c1. Jarvis shows an error message.
Use case ends.
-
Use case: UC7 - Edit a Mastery Check
MSS
- User requests to edit a Mastery Check.
-
Jarvis edits the score of the Mastery Check at the given index as the given score value.
Use case ends.
Extensions
-
1a. The user enters an invalid command.
-
1a1. Jarvis shows an error message.
Use case ends.
-
-
1b. The given index is invalid (not a non-zero unsigned integer).
-
1b1. Jarvis shows an error message.
Use case ends.
-
-
1c. The given index is out of the range of the list.
-
1c1. Jarvis shows an error message.
Use case ends.
-
-
1d. The given score value is not 0 or 1.
-
1d1. Jarvis shows an error message.
Use case ends.
-
-
1e. The list is empty.
Use case ends.
Use case: UC8 - Add a Todo
MSS
- User requests to add a personal Todo task.
-
Jarvis adds a personal Todo task with description.
Use case ends.
Extensions
-
1a. The user enters an invalid command.
-
1a1. Jarvis shows an error message.
Use case ends.
-
-
1b. The user does not enter a description.
-
1b1. Jarvis shows an error message.
Use case ends.
-
Use case: UC9 - Add an Event
MSS
- User requests to add a personal Event task at the specified time and date.
-
Jarvis adds a personal Event task at the specified time and date.
Use case ends.
Extensions
-
1a. The user enters an invalid command.
-
1a1. Jarvis shows an error message.
Use case ends.
-
-
1b. The user does not enter a description.
-
1b1. Jarvis shows an error message.
Use case ends.
-
-
1c. The user enters an invalid date or time.
-
1c1. Jarvis shows an error message.
Use case ends.
-
Use case: UC10 - Add a Deadline
MSS
- User requests to add a personal Deadline task at the specified time and date.
-
Jarvis adds a personal Deadline task at the specified time and date.
Use case ends.
Extensions
-
1a. The user enters an invalid command.
-
1a1. Jarvis shows an error message.
Use case ends.
-
-
1b. The user does not enter a description.
-
1b1. Jarvis shows an error message.
Use case ends.
-
-
1c. The user enters an invalid date or time.
-
1c1. Jarvis shows an error message.
Use case ends.
-
Use case: UC11 - Delete a Task
MSS
- User requests to delete a personal task in the current list of Tasks with its id number.
-
Jarvis deletes the Task.
Use case ends.
Extensions
-
1a. The user enters an invalid command.
-
1a1. Jarvis shows an error message.
Use case ends.
-
-
1b. The list is empty.
Use case ends.
-
1c. The given index is invalid.
- 1c1. Jarvis shows an error message.
Use case ends.
Use case: UC12 - View Tasks
MSS
- User requests to view their personal Tasks.
-
Jarvis shows a list of Tasks.
Use case ends.
Extensions
-
1a. The user enters an invalid command.
-
1a1. Jarvis shows an error message.
Use case ends.
-
Use case: UC13 - Closes the Jarvis program
MSS
- The user finishes using Jarvis program.
-
The user proceeds to close the program.
Use case ends.
6.4 Non-Functional Requirements
- Should work on mainstream Operating System as long as it has Java
11or above installed. - Should be able to hold up to 1000 students without a noticeable sluggishness in performance for typical usage.
- A user with above average typing speed for regular English text (i.e. not code, not system admin commands) should be able to accomplish most of the tasks faster using commands than using the mouse.
- The system should be backward compatible with data produced by earlier versions of the system.
- The system should work on both 32-bit and 64-bit environments.
- For now, the product is not required to handle the printing of reports.
- Should be easy for the user to migrate all information in Jarvis onto a separate computer.
6.5 Glossary
- Mainstream Desktop Operating System: Windows, Linux, Unix, OS-X
- Private contact detail: A contact detail that is not meant to be shared with others
-
Mastery Check: Type of special
Consultationthat is recorded and graded in the CS1101S module. It extends fromConsultationclass. -
Task: An abstract class that encompasses 3 subclasses,
Todo,EventandDeadline.Todois a basic simpleTaskthat is usually not constrained by time;Eventis aTaskthat requires completion at a particular point in time;Deadlineis aTaskthat requires completion before a particular point in time.
7. Appendix: Instructions for manual testing
Given below are instructions to test the app manually.
7.1 Launch and shutdown
-
Initial launch
-
Download the jar file and copy into an empty folder
-
Double-click the jar file Expected: Shows the GUI with a set of sample contacts. The window size may not be optimum.
-
-
Saving window preferences
-
Resize the window to an optimum size. Move the window to a different location. Close the window.
-
Re-launch the app by double-clicking the jar file.
Expected: The most recent window size and location is retained.
-
-
Saving login details
- Successfully edit the correct
usernameandpasswordupon launching the program. Expected:login.jsonfile saves most recent correctusernameandpassword.
- Successfully edit the correct
-
Shutdown
-
Click the cross button at top right side of window for WindowsOS, and top left side of window for MacOS.
-
Type
exitcommand in the Command Box in GUI.
Expected: Stops and closes the program.
-
7.2 Deleting a Consultation
-
Deleting a
Consultationwhile allConsultationsare being shown-
Prerequisites: List all
Consultationsusing theview -ccommand. MultipleConsultationsin the list. -
Test case:
delete -c 1
Expected: FirstConsultationis deleted from the list. Details of the deletedConsultationshown in the status message. GUI’sConsultationlist is immediately updated. -
Test case:
delete -c 0
Expected: NoConsultationis deleted. Error details shown in the status message. GUI’sConsultationlist underConsultationtab remains the same. -
Other incorrect delete commands to try:
delete,delete -c x(where x is larger than the list size or smaller than 1)
Expected: Similar to previous.
-
7.3 Adding a Deadline
-
Adding a
Deadline-
Test case:
add -d example deadline d/2020-12-12 t/17:55
Expected: A newDeadlineis added to the end of the list. Details of the newly addedDeadlineshown in the status message. GUI’sTasklist under theTasktab is immediately updated. -
Test case:
add -d d/2020-12-12 t/17:55
Expected: NoDeadlineis added due to missing description. Error details shown in the status message. GUI’sTasklist remains the same. -
Other incorrect add commands to try:
add -d example deadline d/ t/17:55,add -d example deadline d/2020-02-31 t/20:20
Expected: Similar to previous due to incorrect date and time or missing input.
-
7.4 Viewing a Student
-
View a
Studentwhile allStudentsare being shown-
Prerequisites: At least have 1
Studentunder theStudenttab in GUI. -
Test case:
view -s peter pan
Expected: Success message of viewing 1Studentis shown in the status message.Studentwith namepeter panis filtered and shown in theStudentlist on the GUI. -
Test case:
view -s invalid name
Expected: NoStudentof such name is found. GUI displays emptyStudentlist, showing “No Student” text. -
Test case:
view -s
Expected: Success message of viewing allStudentsis shown in the status message. AllStudentsdisplayed in the GUI under theStudenttab.
-
7.5 Edit Login Details
-
Edit
Usernameand / orPassword-
Prerequisites: A tutor of CS1101S, to be able to log into Source Academy.
-
Test case:
edit -l u/username p/password,edit -l u/usernameoredit -l p/password
Expected: Success message of editing username and password is shown in the status message.usernameandpasswordsaved tologin.jsonfile. Welcome message reflected on GUI. -
Test case:
edit -l,edit -l t/password
Expected: Error message shown in the status message. GUI welcome message remains unchanged.login.jsonfile remains unchanged.
-
7.6 Saving data
-
Dealing with missing/corrupted data files
-
Data file,
jarvis.jsonis edited incorrectly manually while the program is running.
Expected: No harm is caused. Once program shuts down or a new command is inputted in GUI,jarvis.jsonis rewritten as per what is correct previously. -
No Internet Connection while using the program.
Expected: No harm is caused. Changes are made and saved locally after the program is launched and the GUI is up. New modifications through using the program is still saved injarvis.json.
-
-
Autosave per command and on shutdown
-
Successful command inputted in GUI
Expected:jarvis.jsonis saved automatically after every successful command. Does not matter if the command affectsjarvis.jsonfile data or not. -
Unsuccessful command inputted in GUI
Expected:jarvis.jsondoes not update or save automatically. The incorrect command is ignored.
-
8. Appendix: Effort
-
While AB3 deals with only one entity type,
Persons, Jarvis deals with multiple entity types, includingStudents,Consultations,Mastery Checks,Missions,Quests,Todos,Deadlines, andTasks. -
While AB3 does not have web-based functionalities, Jarvis has the
Scrapercomponent that uses the Chrome_Driver package to scrapeSource Academyfor course information. -
While AB3 does not have tab-switching functionalities, Jarvis has multiple tabs that the user can switch to by either clicking on them or entering a related command.
-
While AB3 does not have a
Flagsystem, Jarvis has multipleFlagsthat are used to distinguish between different types of Add, Delete, Edit, and View Commands. -
While AB3 does not have a
Loginfunctionality, Jarvis has aLoginsystem that checks the user’s LumiNUS credentials. Jarvis also has aGreetingclass that displays the current user’s name on the upper-right corner of the GUI. -
Jarvis also has a
Summarysystem that displays upcomingDeadlines,Tasks,ConsultationsandMastery Checks, which is not implemented in AB3.